Forget those old winter covers held down by shifting water bags. A real inground safety cover anchors right into your concrete deck, keeping kids and pets safe from accidental falls. If your pool isn't a perfect rectangle, ordering a custom cover requires some precise math—specifically, a triangulation process called the A-B method. The manufacturer builds your cover based exactly on the numbers you submit, so getting it right is crucial.
Do You Actually Need A-B Measurements?
Not every pool needs the A-B treatment.
| Pool Type | Layout Shape | Measurement Method |
| Type 1 | Rectangular, Grecian, L-shape, bowed-end | Basic length and width lines |
| Type 2 | Kidney, lazy L, oval, freeform | A-B triangulation required |
You also have to use the A-B method if you have non-removable obstacles within 15 to 24 inches of the waterline (like handrails, rock features, waterfalls, or slide legs). Finally, if you are replacing an old cover and want the new straps to perfectly match the existing brass anchors in your deck, you have to provide a separate set of A-B measurements just for those specific anchors.
Your Concrete-Safe DIY Toolkit
Pick a dry day for this—tape and chalk refuse to stick to wet coping. Here is what you need to gather:
150-foot tape measure: A reel-type tape is best. You will be making long diagonal pulls across the pool, so standard pocket tapes will not cut it.
Deck markers: Go with heavy-duty duct tape or bright masking tape. Sidewalk chalk works, but it takes weeks to completely wash off. Tape is cleaner, lets you write numbers on it with a Sharpie, and peels right off. Never use permanent markers or crayons directly on your concrete.
Recording gear: Grab the custom measurement form from your cover manufacturer, or just use a clipboard, paper, and pen.
Camera or smartphone: You will need wide shots and close-ups of your layout and obstacles for the design team.
A helper: You cannot do this alone. One person holds the tape securely at the anchor point, and the other pulls it tight, reads the measurement, and writes it down.
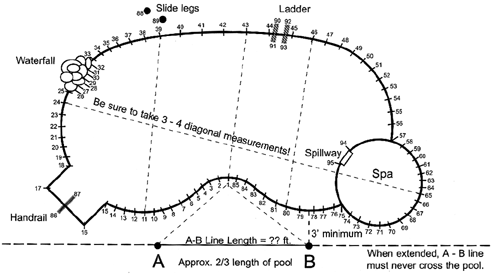
Step 1: Set the A-B Baseline
First, establish two reference points on your deck—Point A and Point B. This imaginary baseline is the anchor for every measurement you take. You must stick to these rules:
Positioning: As you face the pool, Point A must be on your left and Point B on your right. Flip them, and the factory software will build a mirror image of your pool.
Placement: Pick a flat surface parallel to the long side of the pool. Keep it at least 3 feet (4 to 5 feet is better) away from the water's edge or any obstacles.
Distance: The gap between A and B should be at least 15 feet (up to 25 feet for larger pools), covering roughly two-thirds of the pool's total length.
Clear path: The straight line between A and B cannot cross the water or any deck obstacles.
Since you are on a solid concrete deck, avoid driving metal rebar into the yard. Try one of these non-destructive methods:
The Tape "X" Method: Stick a tough piece of duct tape on the dry concrete for points A and B. Draw a sharp "X" on each. Your helper needs to hold the tape measure hook directly on the center of that "X" for every single pull.
The Anchor Hack: If you already have brass anchors from an old cover, drop a safety cover hex key into an anchor shell. It makes a perfect, secure, swivel-ready pivot point for your tape measure hook.
Measure the exact distance between Point A and Point B before you do anything else. If that single initial number is off, the entire triangulation will fail.
Step 2: Mark the Perimeter and Obstacles
Now map out the water's edge by sticking numbered tape markers along the inside edge of the pool coping.
Start at Point 1: Stand directly across from Point A. Stick your first piece of tape on the inside edge of the coping and write "1" on it.
Go clockwise: Walk clockwise around the pool. Going counter-clockwise is a classic mistake that results in a backwards cover.
Space them out: Put markers every 2 to 3 feet on straight sections. When you hit tight curves, radiuses, or corners, tighten the spacing to 1 foot so the software can accurately trace the bend.
Tag the obstacles: Mark any non-removable features within 15 to 24 inches of the waterline. Keep your numbering sequence going. If your last perimeter coping point was 50, label your first obstacle point 51.
Step 3: Pull the Tape (Triangulation)
With the pool dotted in tape, start pulling measurements from your baseline to every single point.
Measure Column A: Anchor the tape hook at Point A. Pull it tight to Point 1, read it to the nearest inch, and have your helper write it down. Do the same for Point 2, Point 3, and every subsequent point around the pool.
Measure Column B: Move the hook to Point B and repeat the exact same process. Measure from B to 1, B to 2, and so on.
Cross-checks: After finishing both columns, measure the absolute greatest length and greatest width of the pool (inside edge to inside edge). Then, take 3 to 4 random diagonal measurements across the pool between numbered points (for example, from Point 12 to Point 36) and record the exact distance. The manufacturer uses these cross-checks to verify the mathematical accuracy of your data.
Step 4: Sketch and Snap Photos
A clear visual guide helps the design team resolve any minor discrepancies.
The sketch: Draw your pool on graph paper. Show the general shape, the numbered points, the locations of Point A and Point B, and the position of any obstacles or areas with less than 3 feet of decking. Draw your A-B baseline in the exact same physical relationship to the pool as it is on your deck.
The photos: Grab a wide-angle shot of the whole pool with the tape markers still visible. Then, take close-up shots of any level changes, raised spa walls, rocks, or rails, making sure the nearest numbered markers are in the frame.
Step 5: Pro Tips for an Error-Free Job
The pull-tab trick: When applying your duct tape markers to the coping, fold the front edge under itself to create a small pull tab. This makes the tape effortless to remove once you are finished.
Write less: Do not write a number on every single piece of tape. Just label every fifth marker (1, 5, 10, 15...). This keeps you and your assistant aligned during the measurement calls without slowing down the process.
Check your columns: If you finish and realize Column A has a different number of entries than Column B, you missed a point or recorded one twice. Use those labeled fifth-point markers to backtrack and correct the error.
Leave the baseline: Keep your Point A and Point B duct tape marks or brass anchor references in place until the manufacturer reviews and approves your form. If they notice a mathematically impossible dimension, keeping your baseline intact lets you quickly re-verify that specific spot.