

The Definitive Pool Liner Measurement Guide: How to Measure Your Above Ground Pool Wall Height
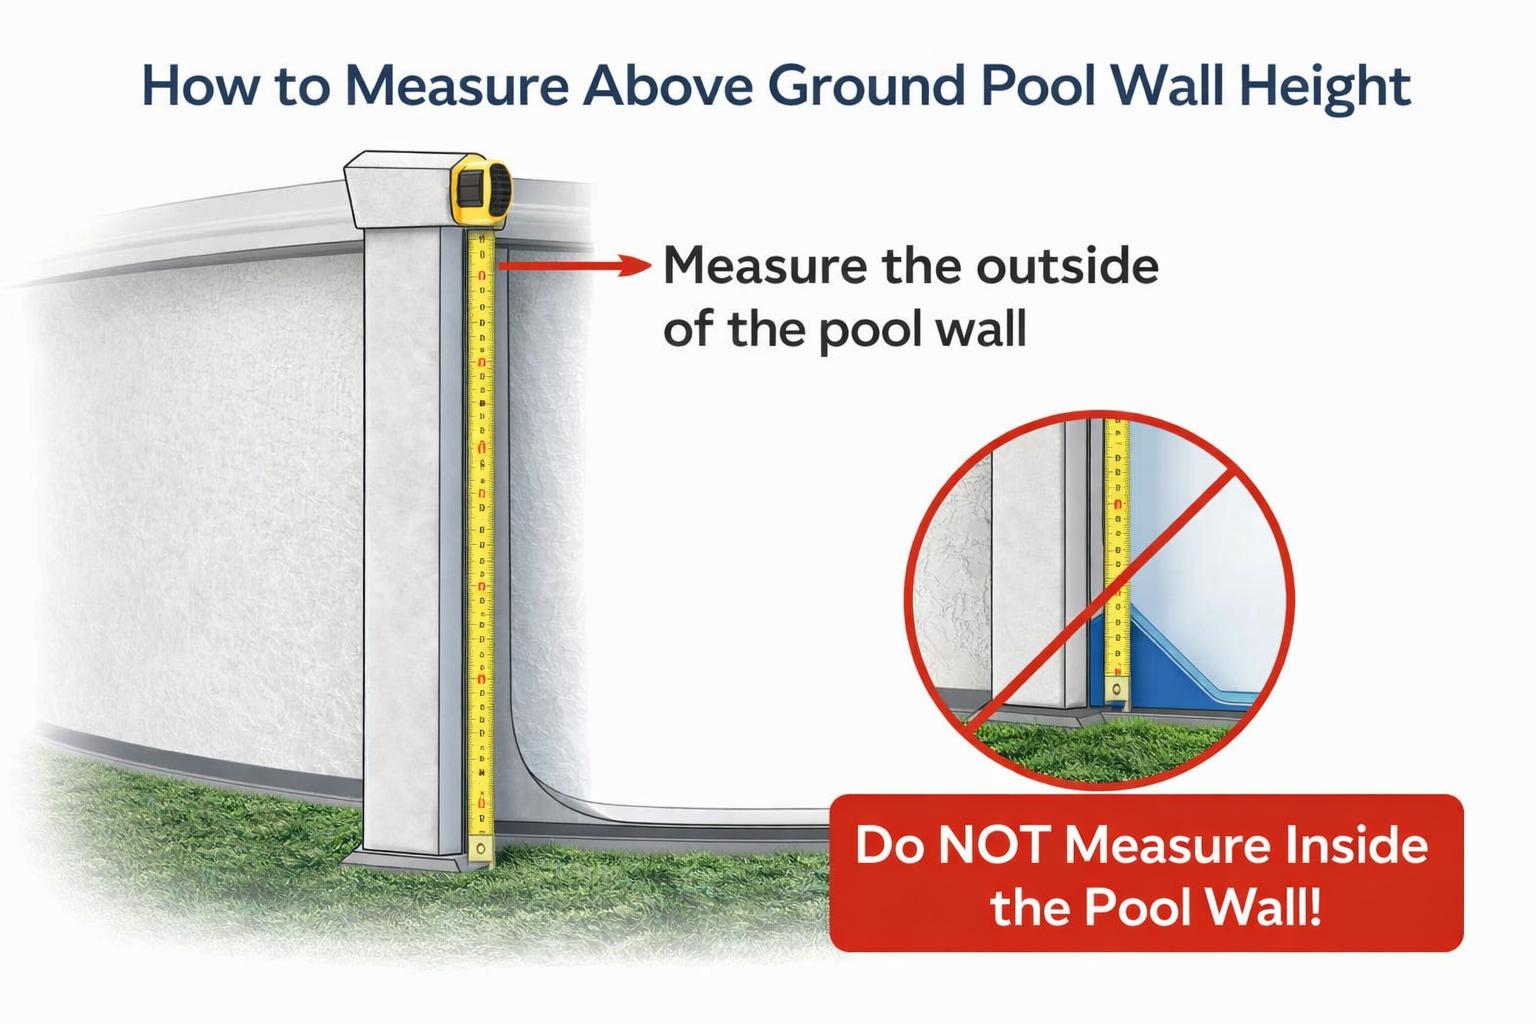
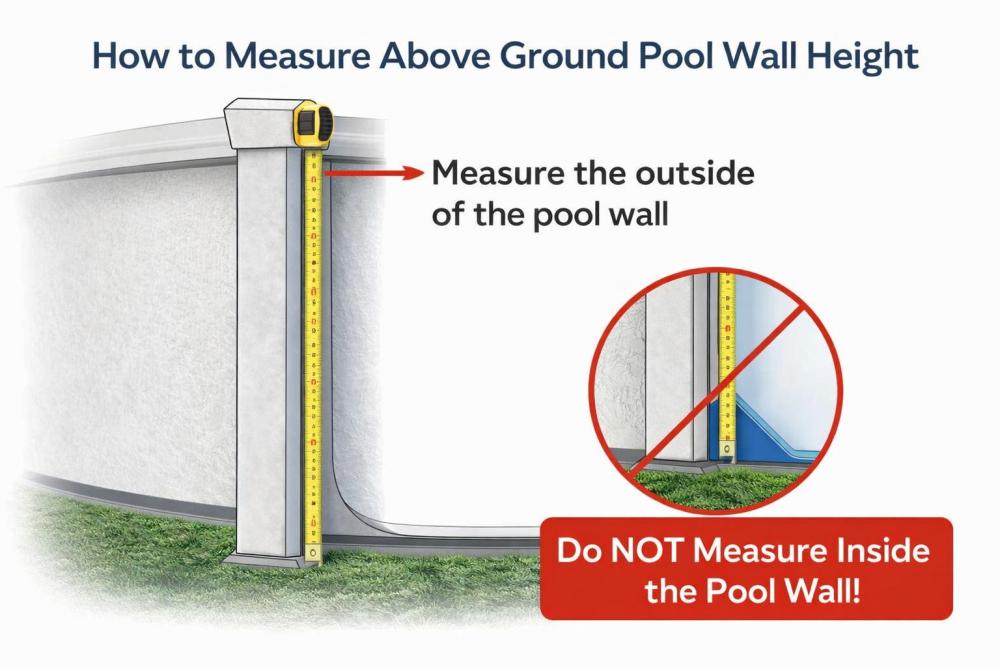
To accurately measure your above ground pool’s wall height for a new vinyl liner, you must perform the measurement on the outside of the pool. Using a standard metal tape measure, measure from the very top edge of the metal wall straight down to the bottom edge where the wall meets the bottom rail or the level ground. Do not include the top rails or caps in this measurement. This external measurement is the industry standard because it provides the true, manufactured height of your pool wall—typically 48, 52, or 54 inches. Measuring from inside the pool will yield an incorrect, shorter number due to the presence of the pool cove, a wedge of foam or sand around the bottom edge of the pool that is placed there during installation to both protect the liner and provide greater strength to the pool. All pool liners are manufactured with the expectation that a cove is installed, so relying on the external wall height is the only way to guarantee a perfect fit and avoid costly purchasing mistakes.
Key Takeaways at a Glance
- Measure Externally, Not Internally: The only accurate method is to measure the physical height of the metal wall from the outside of the pool.
- Top to Bottom: Your measurement should run from the absolute top of the steel or aluminum wall to the absolute bottom of that same wall.
- Ignore the Cove: Measuring inside the pool from the floor to the top rail is incorrect because the pool cove—the angled base where the floor meets the wall—will shorten your measurement by several inches.
- Standard Sizes Are Key: Above ground pool walls are manufactured in standard heights, almost always 48", 52", or 54". Your measurement should be within a fraction of an inch of one of these sizes.
- Liner Type Doesn't Change the Method: This measurement process is identical whether you are buying an overlap pool liner or a beaded pool liner. The wall height dictates the liner size required.
Why Is Wall Height the Most Critical Pool Liner Measurement?
When replacing an above ground pool liner, pool owners often focus on the diameter or length and width. While those are important, getting the wall height perfect is the single most critical step for a successful installation. The vertical fit of a vinyl liner determines its tension, longevity, and appearance. Getting this one measurement right helps prevent wrinkles and ensures a beautiful fit.
What Happens If Your Liner Is Too Short?
Purchasing a liner that is too short for your wall height (for example, a 48" liner for a 52" wall) is a serious issue. The vinyl will be under extreme tension as you try to install it. This over-stretching does several things:
- Installation Failure: In many cases, particularly with beaded pool liners, the liner simply will not reach the top of the wall to be secured in the bead receiver track. You will be physically unable to complete the installation.
- Seam Stress and Failure: The immense strain will be concentrated on the liner’s seams, dramatically increasing the likelihood of a seam separation and rapid and complete water loss.
- Accelerated Aging: Over-stretched vinyl becomes thinner, making it more susceptible to punctures. The pattern will also be distorted, and the material will degrade much faster from UV exposure and pool chemicals, leading to premature brittleness and fading.
What Happens If Your Liner Is Too Tall?
While less serious than a liner that's too short, a liner that is too tall for the wall (e.g., a 54" liner for a 52" wall) creates its own set of problems. The excess material has nowhere to go but down, resulting in:
- Significant Wrinkles: You will be left with large, unsightly wrinkles and folds on the pool floor and at the base of the wall. These wrinkles cannot be smoothed out.
- Cleaning and Maintenance Headaches: Wrinkles are notorious for trapping dirt, algae, and other debris. Automatic pool cleaners often get stuck on them or miss these areas entirely, forcing you to manually vacuum them constantly.
- Potential for Damage: Over time, the trapped debris in these wrinkles can abrade the liner, creating weak spots. The wrinkles can also feel uncomfortable and awkward underfoot.
The Step-by-Step Guide to Measuring Your Pool Wall Height
Follow this procedure exactly. Do not estimate or take shortcuts. This single measurement is the foundation of a successful liner replacement project. This is the ultimate pool liner measurement guide for ensuring a perfect fit.
Tools You'll Need
- A Metal Tape Measure: A rigid, retractable metal tape measure is essential. Do not use a cloth or flexible vinyl tape measure, as it can stretch or sag, giving you an inaccurate reading.
- A Level (Optional): A small level can help ensure your tape measure is perfectly vertical (plumb) against the pool wall for the most accurate reading.
- A Helper (Optional): A second person can help hold the top of the tape measure securely while you read the measurement at the bottom, but it can easily be done by one person.
The Correct Measurement Procedure
- Choose Your Spot: Select a clear, level area on the outside of your pool. It’s best to measure near one of the vertical uprights, as the wall is most stable there.
- Access the Wall: You need to measure the metal wall itself, not the decorative top rail. You will likely need to remove one of the top caps that cover the joints in the top rail. This will expose the top edge of the steel or aluminum wall.
- Position the Tape Measure: Hook the metal tab of your tape measure securely over the very top edge of the metal wall. Ensure it’s hooked on the wall, not the plastic coping strips or bead receiver track.
- Measure Straight Down: Extend the tape measure straight down, keeping it flat against the wall’s exterior surface. Let it run all the way to the bottom metal rail that the wall sits in. The measurement ends where the wall ends.
- Read and Record: Read the measurement at the point where the bottom of the wall meets the ground or sits inside the bottom rail. Your result should be extremely close to 48, 52, or 54 inches. It might read 51 ⅞” or 48 ¼”, but it will be clearly identifiable as one of the three standard sizes.
- Verify in a Second Location: To be absolutely certain, repeat the measurement process in one or two other spots around the pool to ensure your reading is consistent.
Expert Advice: Why You Must Never Measure From Inside the Pool
The single most common and costly error homeowners make is attempting to measure the wall height from inside an empty or partially filled pool. This method seems logical, but it fails to account for a critical component of every above ground pool installation: the pool cove.
Understanding the Pool Cove
The pool cove is a wedge of sand, earth, or pre-fabricated foam that creates a gentle, curved transition between the flat pool floor and the vertical pool wall. Its job is to eliminate the sharp 90-degree angle at the base. This is crucial because it provides support against the immense pressure of thousands of gallons of water, protecting the liner from being forced into that stressful corner and adding strength to the overall pool structure.
How the Cove Gives You a False Measurement
When you stand inside the pool and measure from the liner floor up to the top of the wall, your tape measure isn't starting at the true bottom of the wall. It's starting on top of the cove, which typically rises 3 to 6 inches up the wall. This means an internal measurement of a 52-inch wall pool might still only read 47 or 48 inches. If you use that incorrect measurement to order a 48-inch liner, it will be four inches too short for your 52-inch wall, leading to the over-stretching and installation failure described earlier.
How Manufacturers Design Vinyl Liners
Manufacturers of all `above ground pool liners` produce their products based on the external, true wall height. A "52-inch liner" is not simply a sheet of vinyl 52 inches tall; it is precisely engineered and cut to fit a pool with a 52-inch wall that has a standard-sized cove at its base. The dimensions account for the floor, the cove transition, and the wall height. By measuring the external wall, you are matching the exact specification the liner was designed for.
Does Wall Height Measurement Differ for Overlap vs. Beaded Liners?
No. The method for measuring your pool's wall height is exactly the same regardless of the type of liner you plan to purchase. A pool with a 52-inch wall requires a 52-inch liner, whether it's an overlap or beaded style. The difference between these liners is not their size, but how they attach to the top of the pool wall.
Overlap Pool Liners
An `overlap pool liner` is designed with excess material that is pulled up and over the top of the metal wall. It is then held in place by plastic "coping strips" that clip onto the wall's edge. The decorative top rails are then installed over the coping, securing everything. While they offer a small amount of vertical adjustment during installation, they are still manufactured for a specific wall height to ensure a proper fit without excessive wrinkles or dangerous stretching.
Beaded Pool Liners
A `beaded pool liner` has a thick, rounded edge, known as a bead, that snaps into a corresponding track, called a bead receiver, which runs along the top inside edge of the pool wall. This style provides a very uniform and often more decorative look. Because the bead must fit precisely into the receiver, the wall height measurement is absolutely critical. There is zero margin for error; a liner that is even an inch too short will not be installable. Common types of beaded liners include:
- Standard Bead: The most common type, shaped like a small, upside-down "U."
- J-Hook (or UniBead): This versatile liner has a thick hook shaped like a "J" that can hang directly on the top edge of the pool wall. Most J-Hook liners also have a perforation that allows you to tear off the "J" portion, converting it into a standard bead. Even with this versatility, it must still be ordered for the correct wall height.
Common Problems and Troubleshooting Your Measurement
Even with a clear process, unique situations can arise. Here’s how to handle them.
"My measurement isn't exactly 48, 52, or 54 inches. What do I do?"
This is very common. Due to ground settling over years or slight variations in the bottom track, it's rare to get a perfect 52.00" reading. You will, however, get a number that is undeniably closer to one standard size than any other. For example:
- If you measure 51 ¾", you have a 52" wall.
- If you measure 53 ⅞", you have a 54" wall.
- If you measure 48 ¼", you have a 48" wall.
Always round to the nearest standard industry size. There are no "custom" 51 ½-inch or 53 ¾-inch above ground pool walls.
"My pool is surrounded by a deck or is partially buried. How can I measure?"
This is a challenge but not an insurmountable one. The principle of measuring the external wall remains. You will need to find a way to access it. If your deck is built flush with the top of the pool, you may need to carefully remove a single deck board next to a pool upright. This should give you enough of a gap to slide your tape measure down the outside of the wall. If the pool is partially buried, move to a section of the wall that is fully exposed and take your measurement there. It's far better than guessing and ordering the wrong liner.
Finalizing Your Measurements for a Perfect Order
While wall height is the most common point of error, don't forget to accurately measure your pool's main dimensions. For the best fit, especially on an older pool that may have shifted slightly over time, take two sets of measurements.
- For Round Pools: Measure the diameter from inside wall to inside wall. Take one measurement, then take a second measurement 90 degrees from the first (like a plus sign). Average the two numbers to get your true average diameter.
- For Oval Pools: Measure the overall length from the center of one curved end to the center of the other. Then, measure the width at the absolute widest point in the middle of the pool.
Taking a few extra minutes to measure your pool wall height correctly from the outside is the single most effective step you can take to ensure your `vinyl liner` replacement is a smooth, successful, and cost-effective project. This one simple measurement is the key to ensuring your project is a complete success, resulting in a perfect, wrinkle-free fit that will last for years to come. With this knowledge, you can confidently purchase the right liner and get your pool back in pristine condition.